Fluent Bit: A brief introduction

This article was born from initial studies about Fluent Bit. It’s basically my understanding of the official documentation with some examples of simple use cases.
What is Fluent Bit?
Fluent Bit is an open source and multi-platform Swiss knife for logs processing and distribution.
Nowadays data comes from various sources and Fluent Bit is here to help you aggregate and process all your data in a reliable, secure and flexible way.
Fluentd vs Fluent Bit?
If you ever heard about Fluentd you might be wondering the relation between Fluentd and Fluent Bit, and its not a versus!
Fluent Bit was born from Fluentd. Actually, it was built on top of Fluentd architecture and design.
Summarizing things up, there are four core differences between them, as shown in the table below:
| Feature | Fluentd | Fluent Bit |
|---|---|---|
| Scope | Servers, Containers, Cloud | Embedded Linux, Containers, Cloud |
| Language | C & Ruby | C |
| Memory | ~40MB | ~450KB |
| Performance | High Performance | High Performance |
| Dependencies | Built as Ruby Gem | Zero Dependencies |
| Plugins | More than 1000 | Around 80 |
Core Comparisons from https://docs.fluentbit.io/manual/about/fluentd-and-fluent-bit
Fluent Bit is written in pure C, and has a support for embedded Linux, which is not present in Fluentd.
Also, memory consuming got a huge improvement on Fluent Bit, just like its dependencies are now none, which differs from Fluentd which is built as Ruby Gem.
Even with those differences, Fluentd and FluentBit can complement each other, as both can work as aggregators or forwarders.
Now that we know the differences between Fluent Bit and its mentor Fluentd, let’s talk about some important concepts about Fluent Bit functioning.
Key Concepts
Fluent Bit is built around some fundamental concepts that are very important to understand how it works.
Event or Record
Event and Records are interchangeable terms that refer to every piece of data that is retrieved by Fluent Bit.
Events are made of two components:
[Timestamp, Message]
Example:
Jan 18 12:52:16 flb systemd[2222]: Starting GNOME Terminal Server
Jan 18 12:52:16 flb dbus-daemon[2243]: [session uid=1000 pid=2243] Successfully activated service 'org.gnome.Terminal'
Jan 18 12:52:16 flb systemd[2222]: Started GNOME Terminal Server.
Jan 18 12:52:16 flb gsd-media-keys[2640]: # watch_fast: "/org/gnome/terminal/legacy/" (establishing: 0, active: 0)
In the above example, there are 4 independent Events.
Filtering
We will talk about Filtering more in-depth in the HandsOn part of this article, but now keep in mind that it is a form to modify the contents of our Events.
Tag
A Tag is specified manually (in most cases) on the Input Plugin configuration and is used by the Router to identify information and determine which Filter or Output the information must go through.
Timestamp
As we spoke about it on the Event/Record section, a timestamp represents the time when the Event is created and has the following format:
SECONDS.NANOSECONDS
Where SECONDS is the number of seconds since Unix epoch and NANOSECONDS is a fraction of a second (which is one thousand-millionth of a second).
Remember that timestamps will always exist in a event, either set by the Input plugin or through a data parsing process.
Match
When talking about Tags, we said a Tag is used by the Router to identify information and to decide where to send it.
A Match is how the router knows who must receive the information.
Routers deliver the information to whoever has a Match that matches the specified configuration property Tag in the Input plugin.
Match is a configuration property present in Filters and Output Plugins configuration.
Structured Messages
Either structured or not, every Event that is handled by Fluent Bit gets converted into a structured message, by the MessagePack data format.
Structured messages helps Fluent Bit to implement faster operations.
Buffering
Fluent Bit has some strategies and mechanisms to provide performance and data safety to logs processing.
As the main strategy used by Fluent Bit is to store processed data in the system memory, there is an optional strategy that can be used together with the main option, which is storing data in the file system.
That’s because sometimes we are not able to deliver data fast enough, and this scenario is called backpressure.
Imagine you are receiving tons of logs and your outputs are exhausted and taking too long to receive your data and you are not being able to free the heap space to accommodate the incoming new logs.
For this scenario, Fluent Bit can store not-yet-ready data in the filesystem, to be dispatched as soon as possible. While this data is stored in the filesystem, already processed data ready to be delivered are always sent to memory.
Data Pipeline
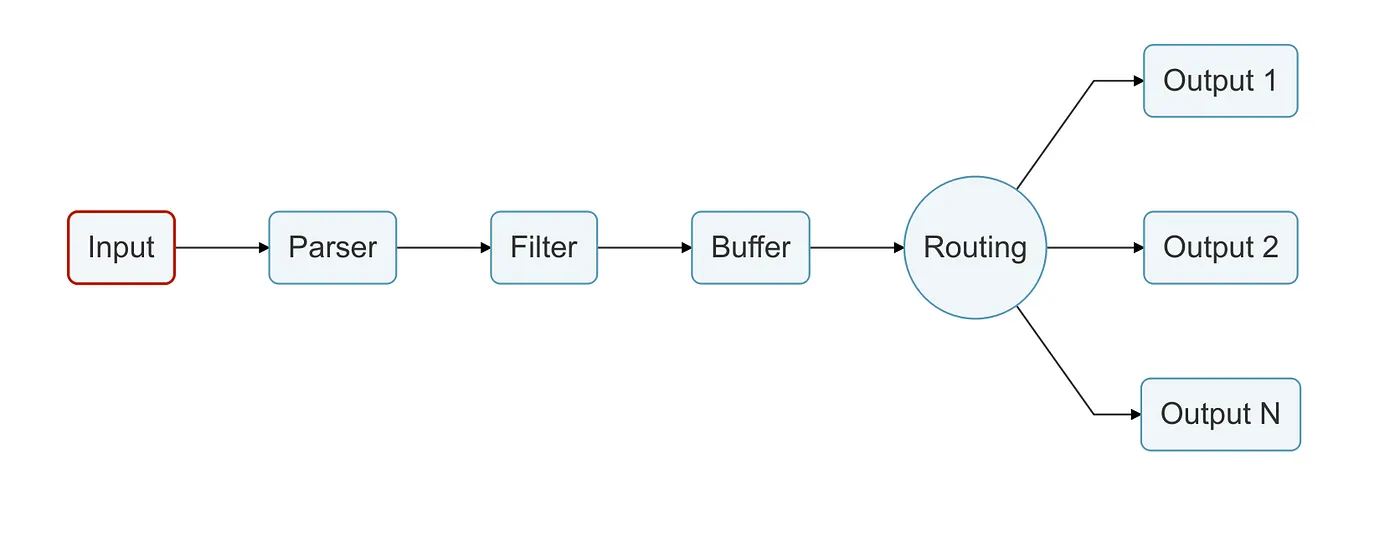
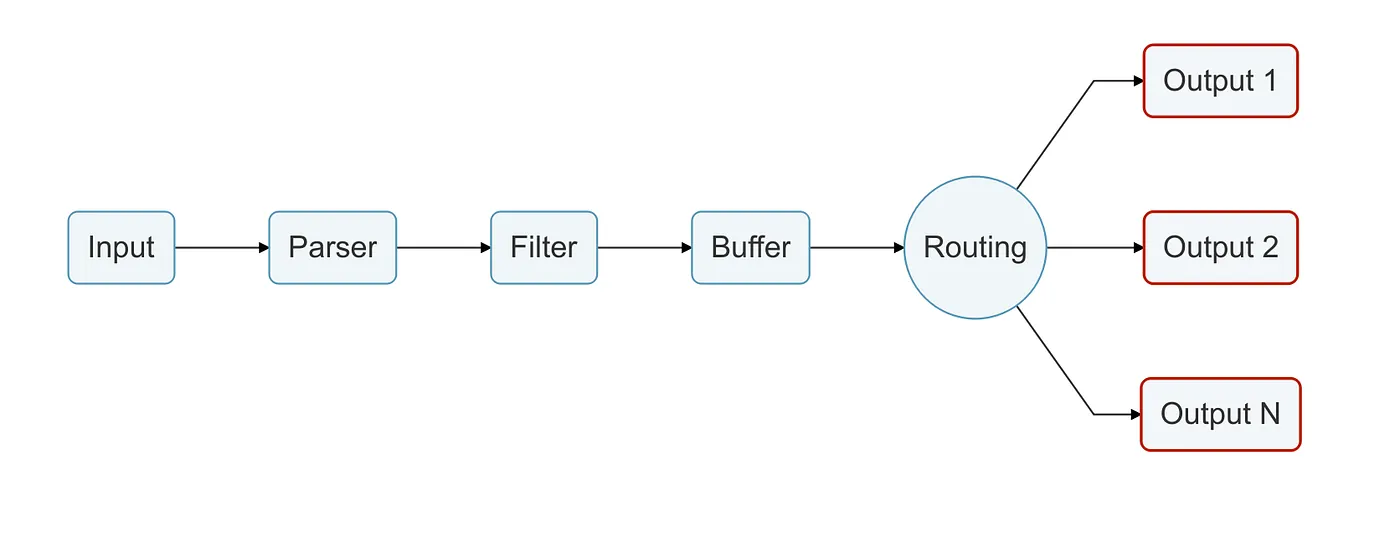
Now that we know about Fluent Bit key concepts and the buffering mechanism, you must be wondering ‘but how it all works internally?’
Working as a log aggregator and forwarder, Fluent Bit has its own way to retrieve, organize, modify and forward all information it handles.
This process is called the Data Pipeline, which is a path all the information retrieved by Fluent Bit Input Plugins must go through.
We will be referring to each part of this pipeline as stages.
Input stage
As you may have figured out, Input is the first stage in the Data Pipeline, and it consists in retrieving information from sources using the Input Plugin configurations.
Some example of Input Plugins, such as Tail and Opentelemetry, can be found at https://docs.fluentbit.io/manual/pipeline/inputs
When an Input Plugin is loaded, an internal instance is created. Every instance has its own configuration properties.
As we spoke about the Data Pipeline and the Input as the main door, below is a figure to help us keep an eye on the data pipeline and the stages we are going through.
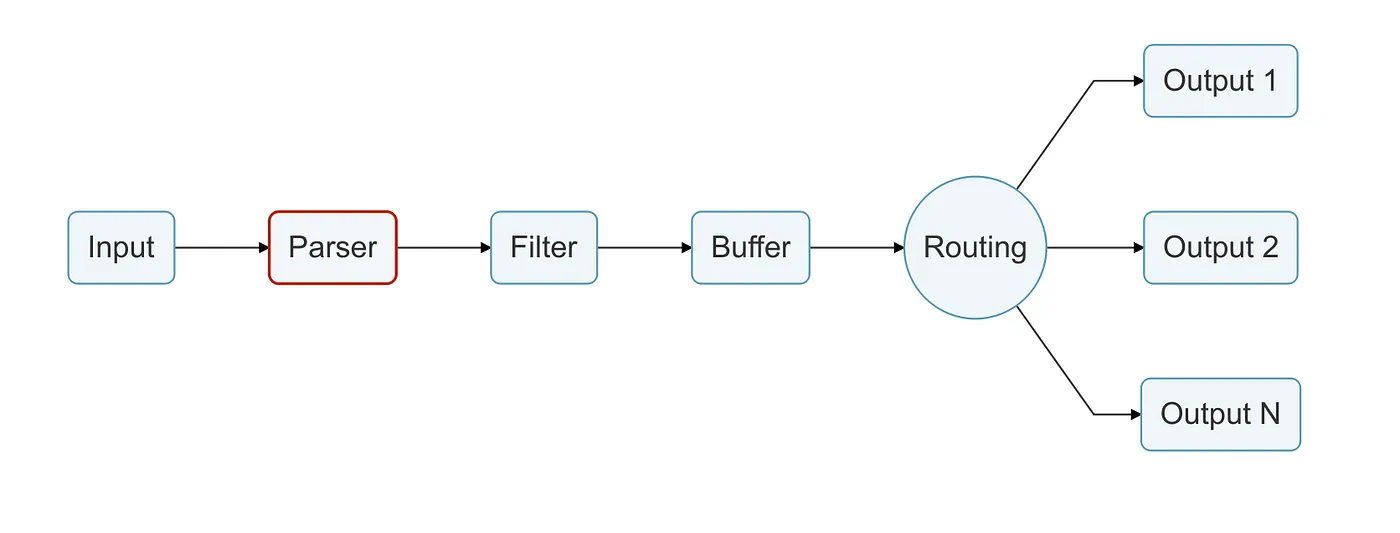
Parser stage
Parsers are responsible of converting unstructured messages to structured ones, as we know that working with unstructured messages is a mess.
Using the proper parser configuration, we can transform unstructured messages to make it easier to be processed and analyzed later.
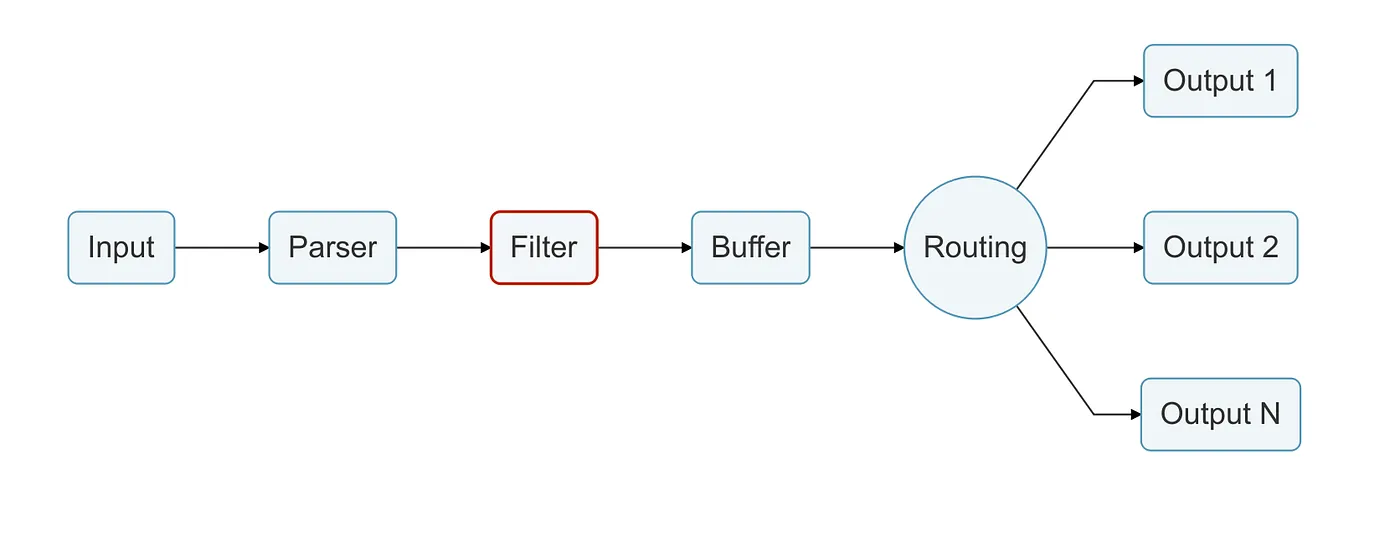
Filter stage
As said before, filters are here to modify the events retrieved by Fluent Bit, by enriching the events context or even dropping some unwanted parts.
Filters are also Plugins, and they work very similar to the Input Plugins we talked about earlier, having its own independent configuration properties.
Filters use the Match property to match Tags previously set on the Input Plugins to know which events they must act on.
Buffer stage
As we spoke before about Buffering, the Buffer Stage is where all the magic happens, and the data is processed with reliability.
In this stage, data is stored using the in-memory or the filesystem based mode, depending on the configuration you provided.
An important part of the Buffer Stage is that all the data here is already in an immutable state, so we can not perform any kind of modifications to it.

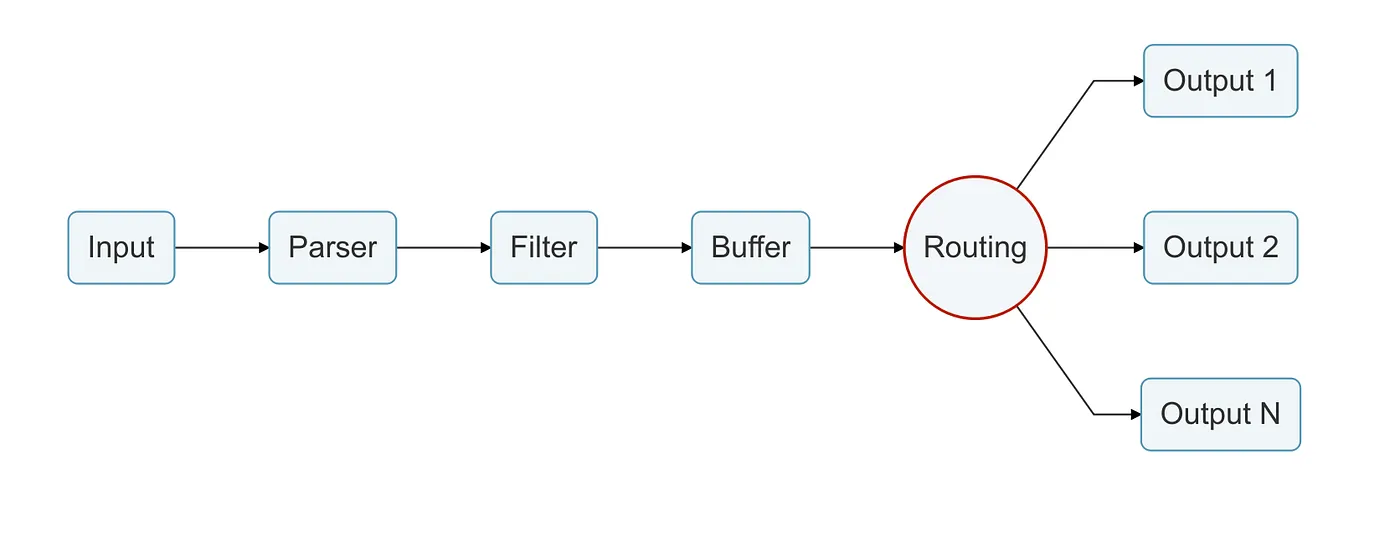
Routing stage
Here we are getting closer to the end of our Data Pipeline.
Routing is a core feature that allow us to route the data we retrieved through our Inputs and has been parsed, filtered and stored.
As Fluent Bit is an aggregator and a forwarder and works at scale, we are able to send our data to multiple Outputs thanks to the Routing Stage.
We can say that Routers binds all the previously processed data to their Outputs, as routers work on the previously said concept of Tags and Match.
As we are going to see in the Output stage, Routers bind the Input Plugin Tag configuration property to the Output Plugin Match configuration property.
Output stage
Here we finally reach the end of our Data Pipeline, and our data reaches its destinations!
The output plugin (as you probably have wondered) acts like the other mentioned plugins. An instance is created and it has its own configuration properties.
By configuring the Output Plugin, the Router knows where to send our data, then our log forwarding process is done.
HandsOn examples
After some theory about the core functionalities of Fluent Bit, its time for some HandsOn experiments.
For the sake of simplicity and demonstration, I’m using Fluent Bit for MacOS, which can be easily installed using Homebrew:
brew install fluent-bitTo install Fluent Bit for your OS, you can check de documentation at https://docs.fluentbit.io/manual/installation/getting-started-with-fluent-bit
Also, all files used in the following examples are stored in my GitHub repository: https://github.com/dumunari/fluent-bit-study
All plugins and configurations are in separate files, so we can include them in our configuration to leverage reutilization.
You can find more about configuration files here: https://docs.fluentbit.io/manual/administration/configuring-fluent-bit/classic-mode/configuration-file
Now lets get our hands dirty!
There are four simple examples about Fluent Bit functionalities in the following subsections.
#1 Info and Err logs to stdout
For our first example, we are going to use the following config file:
This is the main configuration file. Note that it has 2 INCLUDE sections, referencing our input and output plugins.
This is our Input configuration file, we are using the Dummy plugin to simulate info and error logs. We are using Tags to group these logs, so we can handle them in the subsequent stages.
In the Output file we are using the stdout plugin with our wildcard at the Match property, meaning we will aggregate all inputs and forward their results to stdout.
So, at the root directory of our repo, we can run:
fluent-bit --config=./conf/info-and-err-to-stdout.confTo get the following output
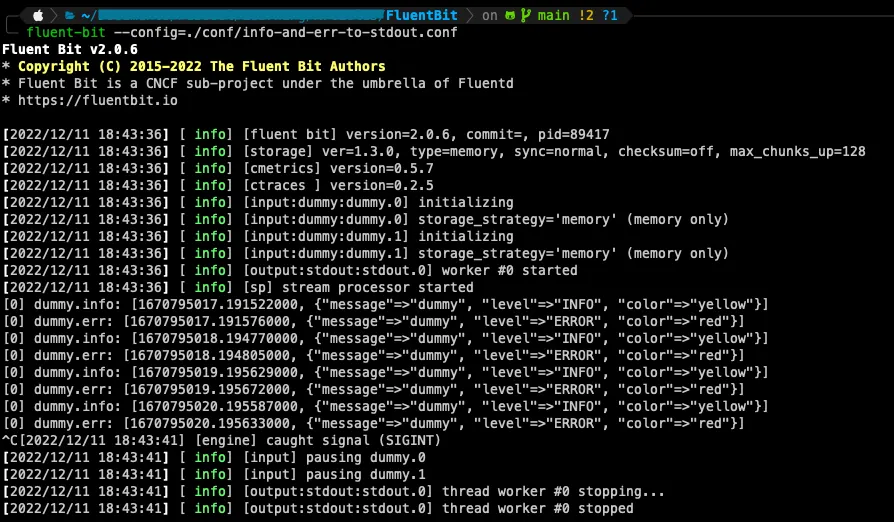
As simple as we wondered, all logs from our Inputs are being redirected to stdout 🙂
#2 Info and Err to separate files
Our configuration file for this example will be:
As we did on our first example, we are still including our info-and-err.conf file as Input configuration, to generate some logs for us.
But now, for Outputs, we are using a different file:
In this one, we are not using our stdout plugin anymore, but the Files plugin instead.
In this configuration, we are leveraging Tags and the Match configuration (remember the Routing stage?) to segregate our logs and send them to their specific files, inside our /tmp file.
Now, running:
fluent-bit --config=./conf/info-and-err-to-files.confWe get nothing on our stdout.
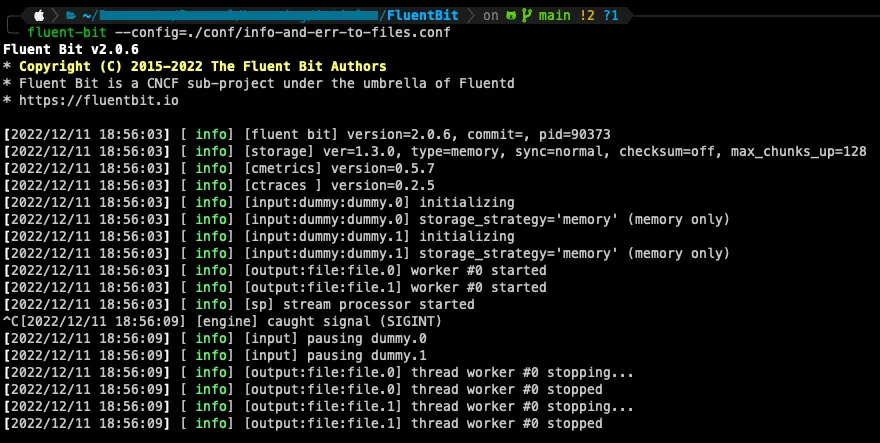
But if we check our log files inside ./tmp
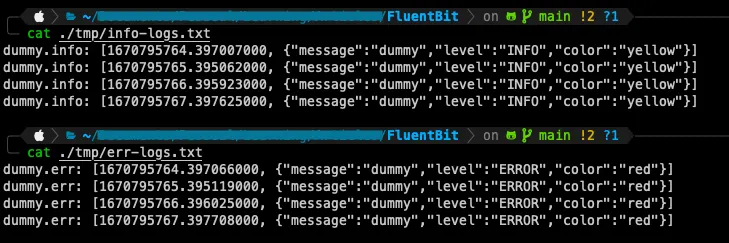
We find our logs distributed to their specific destinations 🙂
#3 Drop unnecessary key
As an example of filtering, now we are going to use the following configuration file:
We are still using our Input and Output files from the last example, but now we are including a new file from our filters folder:
In this file we are going to use the modify Filter plugin to help us removing an unwanted key from the logs retrieved by our Input.
Once again, we are using our Match configuration to aggregate all inputs and put them through our specified filter.
To finish the configuration, the Remove configuration property receives the name of the key we want to remove from our logs.
With this in mind, we can run:
fluent-bit --config=./conf/info-and-err-drop-color.confOnce again, we got nothing on our stdout.
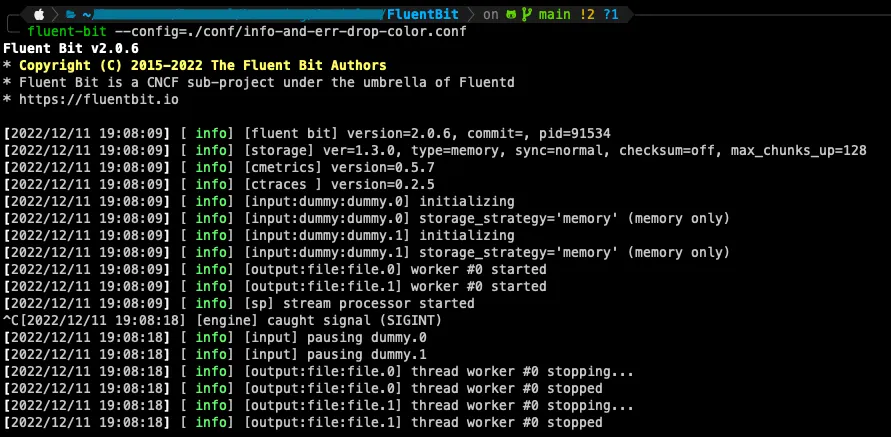
But checking our logs files at ./tmp

Now, almost like in our last example, all our logs went to their specific destinations, but this time we removed the color key from our events 🙂
#4 Parsing a messy data
For our last example, we are going to use the following config file:
This config file has a new section called SERVICE, which is used to define global properties for our Fluent Bit service.
The Input configuration for this example will be:
We are still using our dummy plugin to generate some logs for us, but now we are generating some messy data with lots of information on the same key.
Our filter file this time will be:
In this config file we are using the parser plugin, which consists in using a parser to apply some needed modifications to our events.
The Key_Name property indicates the key that contains all the messy data we want to organize.
The Parser property receives the name of the parsers we want to use.
As defined in our SERVICE section, we are now using our parser file:
Which has the property Name, which must match the Parser property at our filter configuration.
The Format property expects the kind of format we want to use to apply our modification.
The Regex property must be used because we set or Parser format to be Regex, so we can create a regex expression to be applied at the value of the key data specified in the filter.
Note: The Fluent Bit documentation indicates https://rubular.com/ to test the regular expression to be used here.
Finally for the Output configuration, we will use:
Which is the same output config we used in our first example, so we are going to send all our data, after processed, to the stdout.
With all things explained, we can run:
fluent-bit --config=./conf/parse-messy-data.conf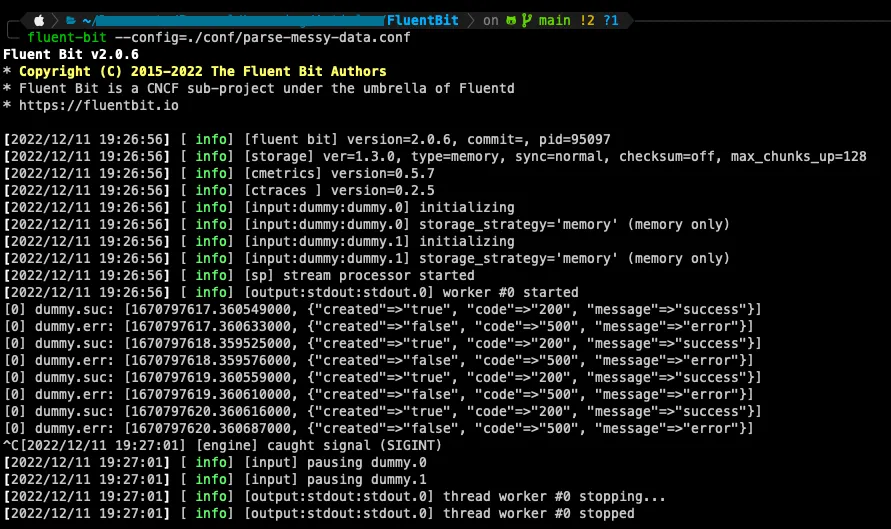
Now, our initially messy data has become easier to understand and to use for future analysis 🙂
Conclusion
After this brief introduction, the real intention here is to elaborate more articles as I keep studying and start linking things up, like adding some real destination to connect with, like Loki, and adding more complex use cases like running things in a Kubernetes cluster, and writing some words about these integrations and specific tools.
But for now, I guess we got a nice introduction about Fluent Bit and how it can be used for log processing, aggregation and forwarding, along with its mechanisms and stages, providing performance and reliability for our logs.
See you in the next article!